Configuring XML file for Microsoft Office Applications
June 10, 2024
Dustin Floyd
Creating an .XML file for deploying Microsoft applications has become a necessity in recent years, but the process used to be much simpler. Before the release of Microsoft 2019 products, deploying these applications typically involved straightforward procedures that didn't require configuring an .XML file.
However, with advancements in technology and the growing complexity of enterprise software deployments, Microsoft introduced the requirement for configuring an .XML file. This change was implemented to provide administrators with more control and flexibility over the deployment process. By configuring an .XML file, administrators can specify various settings and parameters, such as installation options, licensing details, and deployment targets, ensuring a more customized and efficient deployment experience
The benefits of configuring an .XML file for deploying Microsoft enterprise applications are numerous. Firstly, it allows for standardized deployment configurations across multiple environments, ensuring consistency and reliability. Secondly, it enables administrators to automate deployment processes, saving time and reducing the potential for human error. Additionally, by centralizing deployment settings in an .XML file, administrators can easily manage and update configurations as needed, enhancing scalability and maintainability.
Now, let's dive into the process of configuring and deploying an .XML file for Microsoft enterprise applications. Fortunately, Microsoft has an Office Customization tool that assists with the creation of such files. If you need to create this one, kindly follow these steps:
Configuring .XML File
1. Go to https://config.office.com/deploymentsettings
2. Select which architecture your download needs to be in; most up-to-date PCs are 64-bit.

3. Select the programs and the versions and products you want to download. For this example, we will be using Office LTSC Professional Plus:

Select “Next”
4. Select Which Language Packs you want your Office Program to have, in this instance, we will be using the English (United States) Package

Select “Next”
5. Keep installation on Office Content Delivery Network (CDN) and Decide whether or not you would like to Uninstall other Versions of Office Suite Programs:

Select “Next”
6. Select Licensing and Activation: KMS Key is the non Activated Key, MAK is the key from your Microsoft Admin Center Account. For this example, we will be using the KMS Key. Keep Product on User Based Download:

Select “Next”
7. On the Top of the page, select “Export” This will open a pane requesting which File Format you would like to use. Select “Office Open XML Formats

Press “OK”
8. A new Prompt to Export the configuration to XML will appear. Accept the Terms and Conditions and name the XML File what you would like - Please make sure this is easy to type in a Command Terminal Format. For this, we will be using “Configuration”:
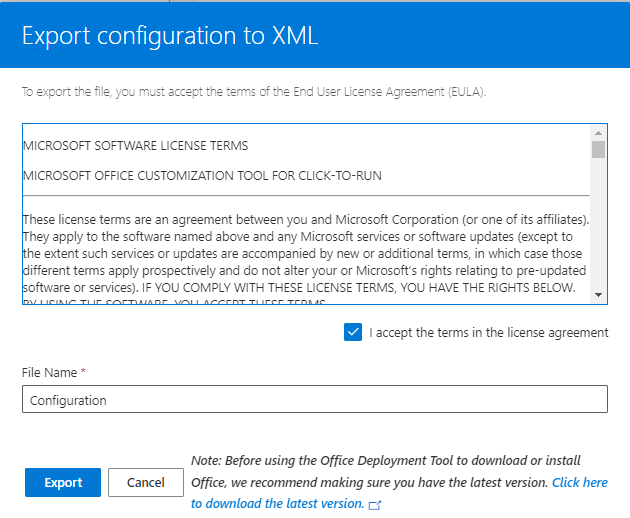
Click Export:
2. Installing with Office Deployment Tool
1. Download the Office Deployment Tool: https://www.microsoft.com/en-us/download/details.aspx?id=49117
- Note: Make sure the setup file and XML File are in the same folder (Setup.exe). For this example, we will use the folder named “XML”

2. Open a Command Terminal in Elevated Permissions on the PC.

3. In the command terminal, type “cd pathway-name”. This designates where the command terminal should look for the configuration file. We will be using “C:\Users\MCSteam\Desktop\XML"

4. Run the command: setup /configure configuration.xml.

5. The installer will now prompt Windows User Account Control (UAC), to allow you to perform the install. Provide the needed credentials and or select "YES" if you would like to proceed with installation.
